World wide Event and Technology related Blog

Responsive Ads Here
Showing posts with label Technology. Show all posts

Friday, June 8, 2018

How to Increase Pendrive/USB Data Transfer Speed 2018

Pen drives or USB are quite popular in the digital world for instant transfer of data. Using USB flash drives, one can easily transfer large files from one PC to another, from PC to laptop, from laptop to TV, and vice versa. This latest technology has made our work easier than before. In current times, you can move Gigabytes of information into just a tiny pen drive within few seconds.

This may be the case that you might be running your computer, laptop with the same USB 2.0 that theoretically offers 35 Mbps speed and not the USB 3.0 device that tends to offer a great speed of 625 Mbps if your device is not brought within this two to three years (that could carry USB 3.0). You might be frustrated while transferring up to the huge files, videos to your device through USB 2.0 even by using the pen drive that actually provides the highest possible transfer rate. You cannot actually increase up to the speed of transfers by a huge margin and out of the limits but still, you could be able to get double the transfer speed on USB 2.0 while using the Pendrive just by using up some methods. Hence you can find it easier to transfer large files in lesser time, to do that in real find up the method described in the article below.

FACTORS RESPONSIBLE FOR DATA TRANSFER RATE:

Before knowing the tricks, we shall have a look at some factors responsible for data transfer rate , and they are as follows.

1.Pen drive ageing: Well, this is common for any device that when it becomes old, the rates gets slower.
2.Type of files: The transfer rate of data also depends on the file type; you might have noticed that songs, videos and documents take very less time in transfer while application files need more time.
3.USB port version: The most popular version of USB is 2.0, and it will give you 35mbps speed. So, if you want fast speed then buy 2.0 version pen drives.

FEW TRICKS TO SPEEDUP PENDRIVE DATA TRANSFER RATE:

1.File system should be NTFS: If you want to Speedup Pendrive , then make sure you have NTFS as file system. You can do so by Right clicking on your pendrive and selecting Format,Select NTFS File system, Uncheck Quick Format And Click On Start.

2.Disk errors: To check disk errors go to the properties tab of your pen drive, then select ‘tools’ tab. You will find a ‘check now’ button, click it and then hit ‘start’ to fix the errors. The time taken for scan depends on the size of the pen drive.


3.Device policy: Under properties of your pen drive, select ‘hardware’ tab. Then select USB device from there that will lead you to a pop up window where you need to change settings. You can even have better performance of pen drive by clicking the option under ‘hardware’ tab.

4.Format: This is one of the effective options that many users have tried. When you have used your pen drive for quite a long time, you can speed it up by formatting the device.

Carefully test your pen drive with the factors given above to Speedup Pendrive. In addition to this, you should keep checking for these aspects regularly, say twice or thrice in a month.

Saturday, June 2, 2018

How To Reduce Image Size without Losing Quality | Png ,Jpg 2018

online image size reduction tool to reduce image size without losing image quality


I am going to show you that how can you reduce the quality of your image size without the image quality loose., but I am still able to reduce the size of the image . Friends, i am going to tell about an online image size reduction tool here. Friends, let's start Step by Step Process :

How To Reduce Image Size without Losing Quality

So many Question comes in the minds of many bloggers. Many Bloggers need images that are good to look but their size is not low. Lower the size of the image, the loading / speed of the blog / website becomes good. And the blog's ranking also gets better. Because of this, people are trying to reduce the size of the image.

Many new bloggers do not even know how to do so and when they are able to do so, they also want to make the size of the image. This is the new blogger's site which has not yet been rated yet. If you are new to a blogger then you have to post a comment on this topic and follow it.

How to Apply Image Compression Easy Process

Step-1 image on your desktop or keep its destination where you can easily find it.


Step-2 Now go to this link https://tinypng.com/  open that website.


Step-3 Now drag and drop or drag the image which is to compress it, there is also the option available on it through the screen.

The image will be compressed and ready for downloading. You can download the image by clicking on the download button.


What does TinyPNG do?

TinyPNG uses smart lossy compression techniques to reduce the file size of your PNG files. By selectively decreasing the number of colors in the image, fewer bytes are required to store the data. The effect is nearly invisible but it makes a very large difference in file size! 

Is it supported everywhere?
Excellent question! The files produced by TinyPNG are displayed perfectly on all modern browsers including mobile devices. Still need to support Internet Explorer 6? It normally ignores PNG transparency and displays a solid background color. With TinyPNG the background becomes transparent again. Binary transparency without any workarounds!

Is it safe to use Animated PNG?
Excellent question! Chrome, Firefox and Safari all support APNG. Google added their support in Chrome 59 only just recently in June 2017 so it is expected that the format will really start to take off from now! It only leaves Microsoft Edge and we can vote for their support.

Apple added animated stickers to iMessage with the release of iOS 10. If you want to create and compress stickers under 500 KB take a look at the iMessage Panda sticker example on Github.

Thursday, May 31, 2018

How to Cut Videos with VLC Media Player | Best Tricks for VLC Media Flayer

VLC Media Player is well known as the best free cross-platform multimedia player and framework that's best for playing most videos, audios, DVD discs and various streaming protocols from different sources on almost all computer systems. But you may not be aware of the fact that it can also be used as a video editing tool, with which you can cut or trim any video into smaller clips and segments for free. So if you are just seeking for the easiest video cutting solution to trim your videos, and you happen to have VLC Media Player installed on your computer, then simply follow this guide and we'll show you how to use VLC as a video splitter to easily cut videos and create video clips with a few clicks only.
Image result for VLC Media Player

VLC might not be the most advanced video editing software but it can easily cut videos. Advanced video software requires advanced skills to perform even basic tasks like trimming a video. But VLC is simple enough to allow you to trim parts of your videos. You will never have to keep a lengthy video file because of some clips in the video that you really don’t want to delete. Just save your favorite segments and leave out the rest. This will also allow you to easily share videos with friends and family via different mediums.
Step 1: Launch VLC media player and activate Advanced controlslocated under the View menu.
activate advance controls
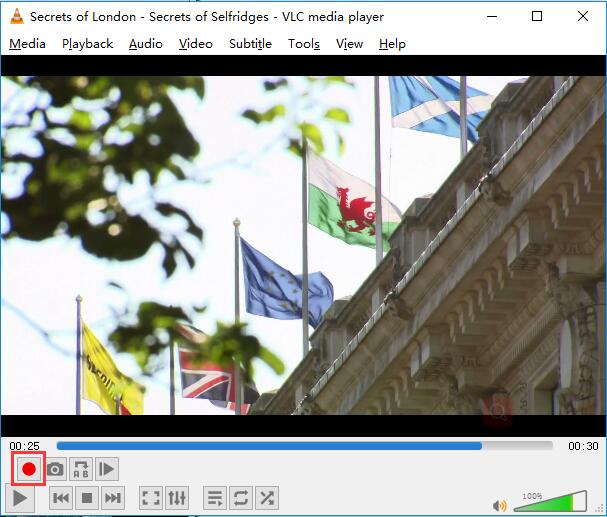
Step 2: Again press the "Record" button when you want to stop the recording.

finish cutting
Step 3: Basically we will not be cutting the video here; we will rather play the video and record the segment using the built-in VLC decoder. So seek to the position you want to start your recording and press both play and record button simultaneously.
record

Note: On some older PCs, after the cutting process is completed, VLC may become unresponsive. If that happens, just close VLC Media Player with the Task Manager. This will not affect the trimmed video.

The speed with which VLC cuts the video will depend upon your computer's specifications. A faster computer cuts quickly while slower PCs take a lot of time.

Formats supported:
VLC can be used to cut videos of all formats that it can play. This means that you can use VLC to cut videos of the following:-
Container formats: 3GP, ASF, AVI, DVR-MS, FLV, Matroska (MKV), QuickTime File Format, MP4, MPEG-2 (ES, PS, TS, PVA), Raw DV, MXF, VOB, RM, DVD-Video, VCD, SVCD, DVB

and

Video formats: Cinepak, Dirac, DV, H.263, H.264/MPEG-4 AVC, H.265/MPEG HEVC, HuffYUV, Indeo 3, MJPEG, MPEG-1, MPEG-2, MPEG-4 Part 2, RealVideo 3 & 4, Sorenson, Theora, VC-1, VP5, VP6, VP8, VP9, DNxHD, ProRes and some WMV.

Wednesday, May 30, 2018

Jio is offering unlimited calling and 1 GB of internet for just Rs 49

Jio turning its focus towards feature phone users, Reliance Jio today announced the lowest rental plan of Rs 49 in which it will offer unlimited voice and data for 28 days for JioPhone subscribers, effective May 05.


Jio's all 4G network doesn't support 2G and 3G smartphones and a large number of Indian population still don't carry a 4G smartphone. Keeping this in mind, Jio came with a basic mobile phone running on Kios that is based on Linux operating system.
Jio has also devised some special recharge plans to cater to the needs of the users in mass numbers. The phone also has its own Jio store to download various apps and games, the phone also comes with an inbuilt browser that lets you stream videos on the youtube.
Reliance Jio came up with its very own Jio Phones priced at Rs 1500 last year with a complete money back guarantee. Jio has devised a different strategy for its Jio phone users. Keeping the low-income groups using the phone in mind. Jio has come up with a very special plan of Only Rs 49 that offers unlimited voice calling and 1 GB of internet which can be used over a month.
The Rs 49 recharge plan is the best when the talk comes to having the best recharge plan at the lowest prices. In case you are planning to buy a Jio Phone, Rs 49 is all you need to spend and you can go on for the month without having to recharge for another time.
"Tariffs charged for feature phone users continue to be exorbitant, while their smartphone counterparts on Jio enjoyed free voice calls and high speed data at the most affordable tariffs. The high feature phone tariffs make it impossible for them to even think of using data...Jio has made data affordable for everyone," the statement said.

Recently, Reliance Jio also decided to offer 500 MB extra data to its subscribers using 1GB and 1.5GB per day data packs with effect from January 26.

Benelli owner spends Rs 5 lakhs to make his bike look like Ducati Panigale

Ducati Fan Converted his bike after modification, has cost him in the region of Rs 8.5 lakhs. The post Benelli owner spends Rs 5 lakhs to make his bike look like Ducati Panigale appeared first on RushLane.
Benelli owner spends Rs 5 lakhs to make his bike look like Ducati Panigale
But what if someone is a diehard fan of the Panigale, but does not have the budget? Well, the answer is in the image you see. Modification specialists in Vietnam have made sure that this diehard fan of Ducati is not left unimpressed with their latest mod-job. They have successfully transformed a Benelli 300 into a Ducati Panigale, as far as looks are concerned.
This replica is purely aesthetic with mechanics remaining unchanged. Benelli TNT 300 gets a makeover with fairing, headlamps, tank and all other body parts borrowed from the Ducati Panigale 899. Each part perfectly blends into the design creating a whole new image for the Benelli TNT 300 and thus creating a Ducati Panigale 899 replica.

While looking identical to Ducati Panigale 899, the engine stays unchanged and it continues to draw power from its 300cc, twin cylinder, liquid cooled engine offering 38 bhp power at 11,500 rpm and 26.5 Nm torque at 10,000 rpm mated to a 6 speed manual transmission.
Engine seen on the Ducati Panigale 899 is significantly more powerful than that powering the Benelli TNT 300. This 899cc, twin cylinder, V Twin engine commands peak power of 146 bhp at 10,750 rpm and peak torque of 99 Nm at 9,000 rpm.
Ducati Fan Converted His Benelli TNT 300 Into Ducati Panigale Replica At Rs 5 lakhs

Recently, in Vietnam, a two-wheeler alteration professionals made an impressive transformation with Benelli TNT 300 which is exciting for all the Ducati followers. He did a great work for a Ducati fan who cannot afford the wonder bike. As you can see in the picture, its hard to make out a Benelli as it completely appears like the sportier Ducati. The exterior design is a copy of the Ducati Panigale 899, but the specs are same of the Benelli. They worked on the Benelli and revised the fairing, headlights, tank and many more components which are acquired from the Ducati Panigale 899.
 Ducati Fan Converted His Benelli TNT 300 Into Ducati Panigale Replica At Rs 5 lakhs
However, the Benelli TNT 300 cannot match the Ducati Panigale 899 regarding the top-specification and power figures, yet the Ducati enthusiast was satisfied with the exterior adjustment. The TNT 300 is powered by a 300cc, twin cylinder, liquid cooled engine which produces 38 bhp of max power @ 11,500 rpm and 26.5 Nm of torque @ 10,000 rpm, whereas, the Ducati is equipped with an 899cc, twin cylinder, V Twin engine which delivers a high power of 146 bhp @ 10,750 rpm and peak torque of 99 Nm @ 9,000 rpm. Engines of both the bikes are combined with a 6-speed manual transmission gearbox. The top speed claimed by Benelli TNT 300 is 158 kmph.
The naked street bike, Benelli TNT 300 offers enhanced customization when it comes to fairing modifications compared to units traded with company fairings. The fan converted the Benelli by just spending Rs 5 lakhs. Nevertheless, the owner got its dream Ducati Panigale 899 at his budget price which no one else has thought before.

Tuesday, May 22, 2018

Download Windows 10 April 2018 (1803) Update ISO

Windows 10 April 2018 Update

he April 2018 Update is available today if you go to Windows Update and manually check for updates. We will begin the global rollout out via Windows Update on May 8. As with previous rollouts, we will use real-time quality feedback to smartly update your device when we have data that shows your device is ready and will have a great experience. You don’t have to do anything to get the update; it will roll out automatically to you through Windows Update if you’ve chosen to have updates installed automatically on your device. Once the download is complete and the update is ready to install, we’ll notify you, so you can pick the right time to finish the installation and reboot, so the update does not disrupt you.
Windows Update message box letting customer know updates are pending
The adoption rate of the Windows 10 Fall Creators Update was the fastest of any version of Windows 10, making it the most widely used version of Windows 10. During the Fall Creators Update roll out we pilot tested machine learning (ML) to intelligently select devices that our feedback data indicated would have a great update experience. The results from the pilot were promising, and we consistently saw a higher rate of positive update experiences for devices identified using ML. For the April 2018 Update rollout, we will expand our use of ML to identify the devices ready to update, incorporating things like additional compatibility data. This will allow us to deliver updates to devices as fast as possible while providing even better customer experiences. With the April 2018 Update, we have also further shortened the amount of time your device is offline during updates up to 63% compared to the Windows 10 Creators Update. The April 2018 Update will follow the same phased rollout approach of proactively monitoring all available feedback and update experience data and making the appropriate product updates during the rollout.

Related Post : How To Activate Windows 10 With Windows 7/8/8.1 Product key

April 2018 Update is the latest feature update for Windows 10. The last feature update, called as Fall Creators Update (1709), was released in October 2017.

Windows 10 April 2018 Update brings several new features to the operating system. The Timeline feature is probably the most talked about feature of this update.

The ability to add security questions to local user accounts, view and delete collected diagnostics data, download and install language packs and fonts from the Store, and HEIF image support are some of the major features of this update. Additionally, there are tons of new settings and options.

The April 2018 Update (1803) is being rolled out and will be delivered via Windows Update. This means that not all Windows 10 users will immediately get the feature update via the Windows Update.

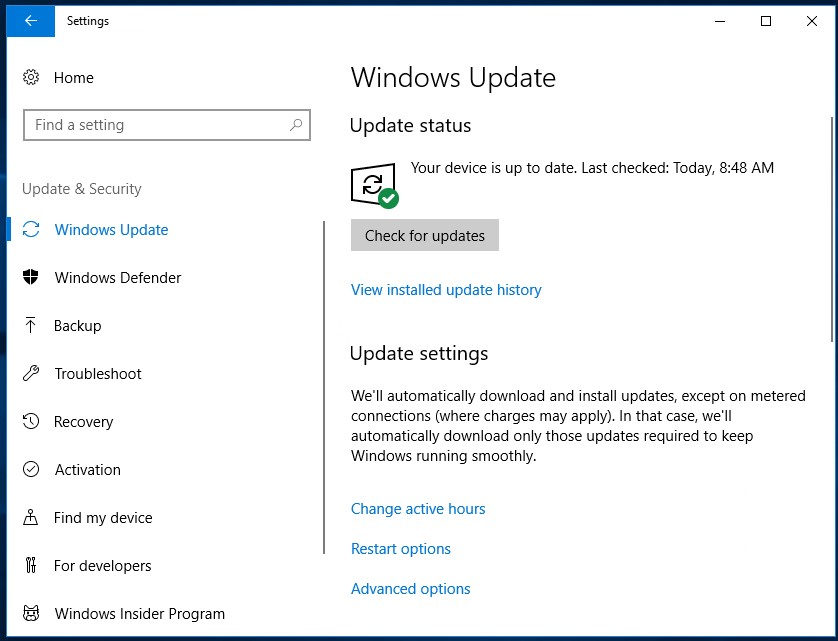
It might take up to a few weeks to months to show up on Windows Update. You can manually check for the Update by navigating to Settings app > Update & security > Windows Update and then clicking Check for Updates button.

Once there, simply click “Check for updates” to begin the download and installation process. You can also watch this video that outlines how to get the April 2018 Update.
Windows Update in Settings
If you’re using a Windows 10 PC at work, you will need to check with your IT administrator for details on your organization’s specific plans to update.

Windows 10 April 2018 (version 1803) ISO

If you need to perform a clean install, you can use the official Windows 10 Media Creation Tool to get the April 2018 Update immediately.
To download the April 2018 Update ISO right away, download the Media Creation Tool. If you have not used the tool before, you can refer to our how to download Windows 10 latest ISO guide for directions to use the Media Creation Tool to download the latest version of Windows 10 ISO from Microsoft.
You don’t need to provide your Windows 10 product key or serial key to download the ISO.
Between if you don’t want to install the update right away, refer to our how to defer or block Windows 10 April 2018 Update article.

How To Activate Windows 10 With Windows 7/8/8.1 Product key

Ever since the official release of Windows 10 on July 29th, over 100 million PC users have upgraded their Windows 7/8.1 installations to Windows 10 using the free upgrade offer.
Windows 10 activation with Windows 7, 8, 8.1 product key
If you upgraded from Windows 7/8.1 to Windows 10 or plan to do so in near future, you probably are aware that you need to upgrade your current Windows 7 or Windows 8.1 installation to Windows 10 in order to get the free upgrade and it’s not currently possible to activate Windows 10 using your Windows 7 or Windows 8.1 product key.
This news came as a surprise to many people. Today (Oct 12, 2015) with the release of the new Windows 10 Insider Preview build 10565, Microsoft announced an important change in this new build which is related to the activation mechanism of Windows 10.
According to official statement of Microsoft:


If you upgraded from Windows 7/8.1 to Windows 10 or plan to do so in near future, you probably are aware that you need to upgrade your current Windows 7 or Windows 8.1 installation to Windows 10 in order to get the free upgrade and it’s not currently possible to activate Windows 10 using your Windows 7 or Windows 8.1 product key.
Microsoft’s decision not to let users activate Windows 10 using genuine Windows 7/8.1 key has forced many users upgrade their Windows 7/8.1installation to Windows 10 even if they wanted to perform a clean install of Windows 10 from ISO. Although once the Windows 7/8.1 installation is successfully upgraded to Windows 10 and activated, it’s possible to easily reinstall Windows 10, many users are experiencing activation issues after the clean install.

Related Post : Download Windows 10 April 2018 (1803) Update ISO
Actually when Microsoft released Windows 10 final RTM version to public, they announced the free Windows 10 upgrade offer which allows existing Windows 7 and Windows 8/8.1 users to upgrade their computers to Windows 10 absolutely free within one year of Windows 10 launch. But to take the benefit of this offer, users need a genuine and already activated Windows 7 or 8/8.1 OS installed in their computers and only after that they can upgrade the existing Windows version to Windows 10.

In this free upgrade offer, when a user upgrades the existing Windows version to Windows 10, the product key of the prior Windows version gets automatically associated with Windows 10 and Microsoft automatically activates Windows 10 as soon as you connect to Internet.
Related Post : Download Windows 10 April 2018 (1803) Update ISO
Some people like me prefer clean installation of new Windows versions. To perform Windows 10 clean installation, you need to first upgrade existing Windows 7 or 8/8.1 to Windows 10 to associate your existing product key with Windows 10 and after that you can format and clean install Windows 10. It'll automatically activate itself as you associated your computer machine ID with Windows 10 successfully at Microsoft servers.

To activate Windows 10 by entering your Windows 7, 8 or 8.1 product key:

Step 1: Open Settings app.
Step 2: Click Update and security.
Step 3: Click Activation. Click Change product key button.
Activate Windows 10 with Windows 7, 8, 8.1 product key
Step 4: Enter your Windows 7, 8 or 8.1 product key and then click Next button to activate your Windows 10.
While clean installing Windows 10 from bootable USB, DVD or ISO, when are prompted to enter the product key, simply enter the genuine product key of Windows 7, Windows 8 or 8.1 to activate your copy of Windows 10.
And if you can’t find your Windows 7/8.1 product key, please refer to our how to recover Windows 8/8.1 product key from BIOS and how to recover Windows 7 product key from registry guides.
Our how to check the activation status of Windows 10 and how to check why your copy of Windows 10 was not activated guides might also help you.

Monday, May 21, 2018

How to Check Ration Card Details with Photo | Assam Ration Card Online

Public Distribution System

India being a Welfare State, the national objective of growth with social justice and progressive improvements in the living standards of the population, makes it imperative to ensure that quality food grain is made available at reasonable prices. The PDS evolved as a major instrument of the Government’s policy for ensuring availability of food grains to the public at affordable prices as well as for enhancing the food security of the poor.

PDS is operated under the joint responsibility of the Central and the State Government. In the State of Assam, the Central Government has taken the responsibility of bulk allocation of food grains. Both the Central and State Government jointly share the responsibility for procurement, storage, transportation and distribution of the commodities to the consumers through PDS network involving Wholesale Consumer Co-Operative Society (WCCS),Gaon Panchayat level Samabai Samity (GPSS),Fair Price Shop (FPS),and Large Scale Multipurpose Co-operative Society (LAMPS). The operational responsibilities including allocation within the state, identification of Below Poverty Line (BPL) families, issue of ration cards, supervision and monitoring the functioning of PDS network rests with the State Government through the district/autonomous district council/sub-divisional authorities.


Targeted Public Distribution System

In June 1997, the Government of India launched the Targeted Public Distribution System (TPDS) with focus on the poor. Under the TPDS, States were required to formulate and implement fool proof arrangements for the identification of the poor for delivery of food grains and for its distribution in a transparent and accountable manner through Fair Price Shops (FPS).
Over the years, PDS has become an important part of Government’s policy for management of food economy in the country. BPL &Aantodaya Anya Yogana (AAY) beneficiaries are targeted with a motive to ensure food security as well as upliftment of their economic status, the PDS concerned with these targeted section (BPL & AAY) is known as TPDS.

How to Check your Ration Card Details with Photo Online for All Over India ? 
I am Going to telling you Step by step :

Method : 1
1. Go to PDS Official website  type or copy from here and paste it at your browser search bar https://pdsportal.nic.in and press Enter. it will open PDS Portal Home Menu. Look at below :

2. Next Click on the PDS Beneficiaries Register and from drop down click on Ration Card Details and All state list will show you. any one state select from the list. look at Screen shot below :


3. Select State and Click Report on category wise No of Ration card Districts will open new window. Look Screen Shot Below :


4. And Click on your District it will ask Tehsil

5. Select Tehsil from the list, Ask for Village

6. Select Village from the list, and show you all the Beneficiary Name with No in your Village.

Use Method No 2. Direct :

Go to This Link to open Ration Card Details with Photo for all State :
See Step by Step :

1. Click on Link below or Copy and Paste your browser search bar and Enter :

2. Select State And District , Tehsil, And Agent Name .

3. Select Card No from the drop down menu and click report.


Link 1 : Click here

Link 2 : Click here

it will open all data which is recorded in your card with Photo. All Family Members name with father name.

 You can Download or Save it PDF, EXCEL, JPEG, XML as your choose.

Sunday, May 20, 2018

11 Best SEO Tips | Top 11 Search Engine Optimization Tips | You should need Know

11 Best SEO Tips | Top 11 Search Engine Optimization Tips | You should need Know


The Top 11 SEO Tips contained in this tutorial were created after years of experimentation and practical application with hundreds of client websites, mostly with final results of achieving higher ranking within the first page of search engine results. We hope you find these SEO tips valuable.


Before pilots push the button for taxiing and take-off, they perform an extensive pre-flight checklist to make sure everything is functioning exactly as it should be.
Entrepreneurs hoping for strong SEO (search engine optimization) rankings might take a lesson here. They can create a checklist of their own to make sure everything is perfect for their next website article. No, an SEO checklist won't protect you from crashing and burning. But it will help ensure that your post has the best chance it needs to rank high in Google. 
So, before you publish your next piece of web content, run it through the following 11-point checklist for the best SEO tips.


No. 1 : Create Trust
Matt McGee, Editor-In-Chief, Search Engine LandMarketing Land
"Focus on creating trust through everything you do online and offline," says McGee. He explains how you have two audiences; search engines and humans. Search engines like Google displays webpages it trusts to searchers. Humans trust Google to show them webpages that answer their questions.
If you create content humans trust, and throw in some of the technical work to make sure Google can process your content, then Google will trust your website and according to McGee, "...your natural traffic will grow and grow and grow. You won't have to worry about algorithm changes. Your website will be crawled more deeply, your content will get indexed faster, and you'll be able to rank for more competitive terms faster."
No. 2 : Produce Virality
Rand Fishkin, Founder and Wizard of Moz, Moz
Fishkin says one of his favorite SEO tips he recommends is to "Create a site, service, product or hook that has a natural, viral feedback component accessible to search engines." He goes on to explain that this is done through links, embedded content (like infographics, see below), badges, and incentives to share. As examples, he points to SimplyHired's job trends charts, OKCupids' data-driven blog posts (new posts no longer being produced, but still a great example), and Mixcloud's social voting/promotion. Fishkin could have included Moz's own Beginner's Guide to SEO and other Moz guides in his list, which have been seen millions of times. Fishkin says that once you figure out how to produce content that spreads, in many ways you've already won the SEO game. "The key components then become content, keywords and a scalable business model."

No. 3. Write the best content.

Now that you know what your competition looks like, it's time to create the content that is going to blow those folks out of the water. This is perhaps the most difficult part, but it's the most important. It needs to be amazing.
I don't care if you are creating a blog post, ecommerce store page or sales-landing page. It needs to be better than the rest, or else neither Google nor your audience will ever take note.
For an example of an article I recently wrote -- with just this goal in mind -- check out "How to Become a Millionaire: The Ultimate Guide.". My goal with that post was to write superb content about that topic. How did I do?

No. 4. Put the keyword in your page title.

This should be a no-brainer, but I'll say it anyway: Your page title should contain your keyword, but that doesn't mean it has to be exact (though it can be).
Additionally, the title must also be interesting enough that people will actually want to click on it! A good example of this would be PT from PTMoney.com, who wrote a great post about "making extra money." However, rather than a boring title, like "Make Extra Money," he titled it "52 Ways to Make Extra Money." Now that is something I would want to read.

No. 5. Pick a good keyword to focus on.

The first step is to simply pick the search term or phrase you want the post to show up for. If I am writing about the best dog toys for small dogs, I'll want to find out what people are actually searching for. 
The easiest way to do this is use Google Keyword Planner, a free tool that will show you an estimate for any search phrase. (Although Keyword Planner is free, you may need to set up an AdWords account to gain access.)
For example, I noticed that "small dog toys" receives 590 monthly searches -- higher than any other related combination of words. However, I'm still not totally ready to start writing about this topic. First, I need to do some research. 

No. 6. Research the competition.

Now that I have a term I want to try to rank for, I'm going to go undercover and do some recon!
Jump over to your "private browsing" mode on your web browser ("Incognito" in Chrome, "Private" in Safari and Firefox, "InPrivate" on Internet Explorer) and head to Google.com. (At my company, we do "private mode" because we don't want Google to use our past search history to influence what we see on the search results page.)
Take a look at all the content on page one of Google, ignoring any ad results at the top. The 10 (or so) results are your competition! What are they missing? Can you do better?

 No. 7 : Discover What Your Competitors are Doing

It’s a fact and one of my Top 10 SEO Tips, that search engines analyze incoming links to your website as part of their ranking criteria. Knowing how many incoming links your competitors have, will give you a fantastic edge. Of course, you still have to discover your competitors before you can analyze them.
Your analysis of competitors should include these extremely important linking criteria (super SEO tips), such as:
  • Competitor rank in the search engines
  • Quantity AND quality of incoming links (prioritized)
  • What keywords are in the title of linking page?
  • % of links containing specific keywords in the link text
  • The Google PageRank or MozRank of linking pages
  • The popularity of the linking domain and the linking page (measured by links & mentions)
Aside from using some of the awesome SEO software mentioned on this website, here are some things I personally do when researching a competitor:
  • Click the link to their Site Map page and see what keyword you find in the links
  • Get a savvy web person to find and parse their XML Site Map to find keywords in page names
  • View the HTML title and meta tags of your top competitors to compile a list of needed content

No. 8 : Write Very Linkable & Sharable Content

An article is not a sexy thing to look at here in today’s online marketing world. Generic content can’t be slapped together and thrown online with the hope that it will get high ranking for the life of that page of content. Think about the book the Long Tail that I linked to above. I do because the content was meanful and useful to me in my career as an SEO Expert. The content could have these attributes if it has any hope of earning and sustaining higher ranking in the search engine results (many of these came directly from Google):
  • The content is useful
  • The content is original
  • You can’t help but link to it
  • There are supportive facts and references
  • There’s enough detail that nobody can memorize it
  • Something fun or interesting is included (like video)
  • It’s not just blah, blah, blah, content
  • There’s enough call to action to invoke engagement
  • There are visual examples, charts, and references
  • You had multiple contributors who all link to the content
  • You thank or compliment someone who shares it with others
  • You have an offer, discount, or promotion included
  • How To’s and tutorials are a great way to get people to link
  • Create a controversy
  • Answer questions
  • Conduct research & discuss the results
  • Get involved with social media
  • Create lists (Top 50 Link Building Techniques, etc)
  • Get a blog and establish yourself as an authority
  • Run a service or create a product (ie: Firefox extension)

No. 9 : Optimize Your Title and Meta Tags

HTML titles and meta tags should be different on every page of your website if you wish for most search engines to store and list them in the search results. Us SEO Experts have experimented with these two pieces of code to help us reach an accepted conclusion about how best to use them and what happens when you optimize them.
The meta “keywords” tag won’t be discussed in to much detail here, since Google has announced that they do not use the meta keywords tag in their ranking criteria. Because Google has 64 percent market share in search, that should be enough to convince you to not spend a lot of time on this attribute.

Optimizing Your Homepage Title

There are different theories about how long your homepage title should be. Since Google only displays the first 66 or so characters (with spaces), my Top 11 SEO tips for the title on anything other than the homepage would be to keep the title under 66 characters and relevant to the content on the page. However, some (including myself) argue that the value of the homepage title may warrant additional search term inclusion. Let’s take a look at Amazon and Ebay homepage titles.

Optimizing Your Homepage Meta Description

Same best practice applies here. Get those top terms into a description that isn’t spammy and is a clear indicator of what your website is about. Below are the meta descriptions from eBay and Amazon.
The rule of thumb here is to get your most important keywords into your homepage title and meta description.

Optimizing Subpage Titles and Meta Tags

Let’s take a break for a moment and discuss Click-Through Rate (CTR) and Bounce Rate. When you perform a search in a search engine, what shows up in your web browser is called an impression. When you make a selection, that selection is called a click. Google and other search engines record each impression and each click to help them understand which listings are being clicked on the most. They also record patterns (so stop thinking about getting all your friends to search for and click your listing). If the majority of normal search volume selects your listing, you’ll have a higher CTR and higher ranking; same applies for Sponsored Ads by the way.
That being said, if a healthy percentage of searchers return to Google’s search results (called a Bounce) and select a different listing, your CTR value will be reduced and ultimately so will your ranking.
To get and stay at the top of the search results, you need to be the most attractive listing in the search result, and you need to provide enough content to prevent the searcher from leaving your website to find a different listing.
This one SEO tip could make or break your SEO campaign.Click-Through Rate (CTR) plays an instrumental role in how relevant Google thinks your website is. By compelling users to click with clear call-to-actions (buy, order, download, beat, fix, etc) and by using value propositions (guaranteed, on sale now, etc), one can improve their CTR and search engine ranking. Oh, don’t forget to squeeze your keywords in there as well.
If you ever forget this SEO tip, just perform a search in Google for “title tag principles”, where you’ll find my listing invoking these principles. Another great resource for learning more about writing effective meta tags can be found on the Splash Copywriter blog, entitled Meta description masterclass: a data-driven guide to the little search snippets that win you big business
Here’s some sample syntax:
<title>Call to Action, Keywords, & Value Proposition (under 66 characters)</title>
<meta name="description" content="Differently worded call to action, keywords, & value proposition (under 160 characters)" />
<meta name="keywords" content="one to five keywords separated by commas" />
No. 10 : Use Title and ALT Attributes
Using the title attribute is a direct method of telling the search engines and the user more information about where a link will take them if they click through it. It’s also a W3C standard for making your page accessible to those who are visually impared. In other words, blind folks can navigate through your website using a special browser that reads title and ALT attributes. Sample syntax might be:
<a href="https://www.wiideman.com/blog/tools-software/semrush" title="SEO Software to Help You Get Higher Search Engine Ranking">SEO Software</a>
The ALT Attribute is used for the same reasons as the title attribute, but is specifically for describing an image to the search engine and to the visually impared. Here’s how you might use ALT attribute in an image tag:
<img src="/images/logo-top11seotips.jpg" alt="Top 11 SEO Tips – Search Engine Marketing Tips and SEO Software Featured by SEO Expert Steve Wiideman">

No. 11 : Optimizing File Nomenclatures

Whenever possible, you should save your images, media, and web pages with the keywords in the file names. For example, if your keyword phrase is "golf putters" you’ll want to save the images used on that page as golf-putters-01.jpg or golf_putters_01.jpg (either will work). It’s not confirmed, but many SEO’s have experienced improvement in ranking by renaming images and media. You also may receive visits from Google Images and other media search queries.
More important is your web page’s filename, since many search engines now allow users to query using "inurl:" searches. For fun, try this query in Google (copy/paste): “ebook site:.com filetype:pdf”. You’ll find all you can eat eBooks (you’re welcome).
Your filename for the golf putters page could be golf-putters.html or golf_putters.html. Anytime there is an opportunity to display or present content, do your best to insure the content has the keywords in the filename (as well as a Title or ALT attribute).
You may need to contact your IT department or webmaster to rewrite your page URLs if your website platform is non-accommodating to custom URL nomenclature.
The above eleven-point checklist may not include everything a person could know about SEO, but by simply following this checklist, you'll be miles ahead of the competition and will likely see your posts get significant SEO traffic.